Whether we like it or not, the cloud is more and more present in our life as DBAs, so it is a good time to try understand some of the possibilities it offers. It’s been a while since my last post, and I wanted to keep exploring some of the new features that SQL Server 2016 offers.
This is technically not new, but you know that it’s said that better wait for a second (or third) version of any technology to adopt it, so I rolled up my sleeves and refreshed my Azure subscription to create some hybrid environment with parts (filegroups) of my database on-premises and others in the cloud (blob storage).
These techniques are somehow explained in Books online, and although the example provided is based on backup and restore but the steps to prepare things are quite similar, so I strongly recommend it as reference.
Background
In order to stretch a database from on-premises to the cloud (Azure) it’s first required to have an Azure subscription (you can get one with some free money in minutes), which I have explained in a blog post not long ago, so I will skip this part and assume you already have one.
Database files are stored in Azure as blobs so we will need to create a Storage Account within our subscription to be able to place those database files.
The process to create our own storage account is pretty straight forward, you can see in the picture where to click from the Azure Dashboard to get it done
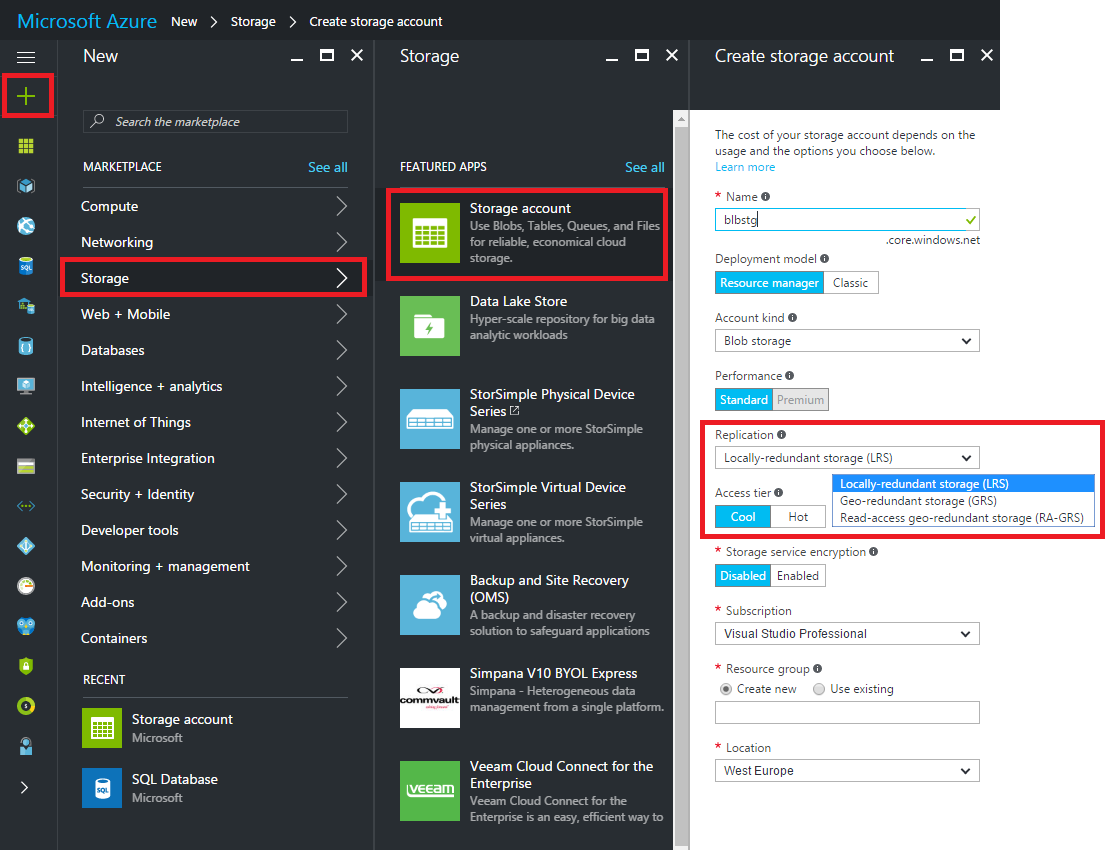
On the rightmost column we have to make the most important decision like every time we create something in Azure, and that is the money, sorry I mean the performance and availability 🙂
The most performance and availability we require, the more money we will be billed, so be careful but remember you can (in theory) upgrade or downgrade with no downtime, so you can adjust the performance to your budget or vice versa.
Powershell
I would personally recommend to use the powershell approach since it’s easier (as simple as copy/paste and change some values) and will also provide the syntax to create the required SQL Server credential, which is required to connect from our on-premises SQL Server instance to the cloud.
You might need to install the powershell module before running the script.
After some modifications to the original, the powershell script would look like this
<#
This script uses the Azure Resource model and creates a new ARM storage account.
Modify this script to use an existing ARM or classic storage account
using the instructions in comments within this script

Original Script -> https://msdn.microsoft.com/en-us/library/dn466430.aspx

Modified by -> Raul Gonzalez @SQLDoubleG

#>
# Define global variables for the script
#
# TODO: Set values
#
$prefixName = 'prefixName'  # used as the prefix for the name for various objects, your choice
$subscriptionName='My Subscription Name'   # the name  of subscription name you will use, look for subscriptions in your azure portal.
$locationName = 'ukwest'  # the data center region you will use, see Get-AzureRmLocation for choices
$storageAccountName= 'storageAccountName' # the storage account name you will create or use
$containerName= 'containerName'  # the storage container name to which you will attach the SAS policy with its SAS token
$policyName = $prefixName + 'policy' # the name of the SAS policy

# Storage Tier options, more money, more performance, see full details about pricing in
# https://azure.microsoft.com/en-us/pricing/details/storage/blobs/
#
$storageType = 'Standard_LRS'   # cheap
#$storageType = 'Standard_GRS'   # mid
#$storageType = 'Standard_RAGRS' # expensive

#
# Using Azure Resource Manager deployment model.
# If you want to use the classic storage account, see original script on the header
#

# Set a variable for the name of the resource group you will create or use
$resourceGroupName= 'blbstg'

# adds an authenticated Azure account for use in the session
Login-AzureRmAccount

# set the tenant, subscription and environment for use in the rest of
Set-AzureRmContext -SubscriptionName $subscriptionName

# check the existance of the resource group and create one if it does not exist
if (!(Get-AzureRmResourceGroup -Name $resourceGroupName)) {
    New-AzureRmResourceGroup -Name $resourceGroupName -Location $locationName
}

# check the existance of the ARM storage account and create one if it does not exist
if (!(Get-AzureRmStorageAccount -Name $storageAccountName -ResourceGroupName $resourceGroupName)){
    New-AzureRmStorageAccount -Name $storageAccountName -ResourceGroupName $resourceGroupName -Type $storageType -Location $locationName
}

# Get the access keys for the ARM storage account
$accountKeys = Get-AzureRmStorageAccountKey -ResourceGroupName $resourceGroupName -Name $storageAccountName

# Create a new storage account context using an ARM storage account
$storageContext = New-AzureStorageContext -StorageAccountName $storageAccountName -StorageAccountKey $accountKeys[0].Value

$container = Get-AzureStorageContainer -Context $storageContext -Name $containerName
# Creates a new container in blob storage if not exists
if (!$container){
    $container = New-AzureStorageContainer -Context $storageContext -Name $containerName
}
$cbc = $container.CloudBlobContainer

# Sets up a Stored Access Policy and a Shared Access Signature for the new container
$permissions = $cbc.GetPermissions();
$policy = new-object 'Microsoft.WindowsAzure.Storage.Blob.SharedAccessBlobPolicy'
$policy.SharedAccessStartTime = $(Get-Date).ToUniversalTime().AddMinutes(-5)
$policy.SharedAccessExpiryTime = $(Get-Date).ToUniversalTime().AddYears(10)
$policy.Permissions = "Read,Write,List,Delete"
try{
$permissions.SharedAccessPolicies.Add($policyName, $policy)
}
catch{
    echo 'An item with the same key has already been added. Skipping this step.'
}

$cbc.SetPermissions($permissions);

# Gets the Shared Access Signature for the policy
$policy = new-object 'Microsoft.WindowsAzure.Storage.Blob.SharedAccessBlobPolicy'
$sas = $cbc.GetSharedAccessSignature($policy, $policyName)
Write-Host 'Shared Access Signature= '$($sas.Substring(1))''

# Outputs the Transact SQL to the clipboard and to the screen to create the credential using the Shared Access Signature
Write-Host 'Credential T-SQL'
$tSql = "CREATE CREDENTIAL [{0}] WITH IDENTITY='Shared Access Signature', SECRET='{1}'" -f $cbc.Uri,$sas.Substring(1)
$tSql | clip
Write-Host $tSql
Create the credential
If everything has gone according to the plan, we should have already copied to the clipboard the T-SQL to create the credential, which should look like
USE master
GO
CREATE CREDENTIAL 'https://<mystorageaccountname>.blob.core.windows.net/<mystorageaccountcontainername>' -- this name must match the container path, start with https and must not contain a forward slash.
   WITH IDENTITY='SHARED ACCESS SIGNATURE' -- this is a mandatory string and do not change it.
   , SECRET = 'sharedaccesssignature' -- this is the shared access signature key that you by running the powershell script
GO
Stretching our database
If you follow the example provided on Books Online, you will end up restoring a copy of your on-premises databases onto the cloud, but as I see it, stretching my database will feature a combination of on-prem stored files plus some others on the cloud, probably those that doesn’t require lots of juice.
Once we’re here, all should be very familiar for on-premises DBA’s.
CREATE DATABASE [stretch_test]
ON PRIMARY(
	NAME = N'st_primary'
	, FILENAME = 'C:\Program Files\Microsoft SQL Server\MSSQL13.MSSQL2016\MSSQL\DATA\stretch_test\st_primary.mdf'
	, SIZE=5MB, FILEGROWTH = 4MB)
, FILEGROUP [USER_DATA](
	NAME = N'st_user_data'
	, FILENAME = 'C:\Program Files\Microsoft SQL Server\MSSQL13.MSSQL2016\MSSQL\DATA\stretch_test\st_user_data.ndf'
	, SIZE=4MB, FILEGROWTH = 4MB)
, FILEGROUP [STRETCH_DATA]
	(NAME = N'st_stretch_data'
	, FILENAME = 'https://<mystorageaccountname>.blob.core.windows.net/<mystorageaccountcontainername>/st_stretch_data.ndf'
	, SIZE=4MB, FILEGROWTH = 4MB)
LOG ON (
	NAME = N'st_Log'
	, FILENAME = N'C:\Program Files\Microsoft SQL Server\MSSQL13.MSSQL2016\MSSQL\DATA\stretch_test\st_log.ldf'
	, SIZE = 4MB , FILEGROWTH = 4MB )
GO
That’s pretty the same, but just pointing to our blob storage to put there the files we chose they are better off in the cloud.
Checking database’s metadata, all seems normal
SELECT DB_NAME(f.database_id) AS db_name
		, f.file_id
		, f.name AS logical_name
		, FILEGROUP_NAME(f.data_space_id) AS [filegroup]
		, f.type_desc
		, (f.size * 8 / 1024) AS size_MB
		, physical_name
	FROM sys.master_files AS f
	WHERE f.database_id = DB_ID('stretch_test')

Conclusion
Once again I have been surprised how quickly you can start using Azure in an old fashion way, I mean with just little extra knowledge which is something really good.
Just a small change can open multiple possibilities and bring benefits like reducing the cost of our storage, improve our availability without expending a fortune in fancy gear and much more.
I’m really getting into this and feel like exploring a lot, because sooner or later we will need to be ready for maybe not all, but some projects in the cloud.
Thanks for reading!