This week I want to go another step into moving databases to the cloud and start using some advanced features that Azure offers Last post, we explored how to move part of our databases to the cloud by creating a new file on the Azure blob storage service, which is cool, but to be honest, this kind of hybrid solution might not give us the best out of the cloud.
One of the reasons used by Microsoft to sell their cloud is that they claim moving to Azure will ease the way we maintain our databases.
And [one of] the most important things when working with databases is always to have a good backup available in case is required.
As soon as our databases have grown to a certain point, simple maintenance tasks like performing a backup can be a challenge, taking several ours to complete and probably more to be restored affecting our RTO and therefore compromising our SLA’s.
But coming back to Azure, what tools are provided to allow us to reduce this backup-recovery time? Yep, you’re right, it’s just naming this post… ‘File Snapshot Backups‘
Finishing last day’s job
One of the limitations for these ‘File Snapshot Backups’ (and probably the most important) is that all our databases files must be stored in the cloud, so we can take my previous post just as the preparation for what is coming now.
In order to move our files to the cloud we have different possibilities, one might be the typical approach where we’re allowed for some down time.
Using the same database from the last post we’re going to proceed, but let’s remember first that we had a database with three files locally and one stored in Azure Blob storage. Like this.

So the three remaining files have to go to the cloud too.
USE [master]
GO
ALTER DATABASE [stretch_test]
	MODIFY FILE (NAME = N'st_primary', FILENAME = N'https://<mystorageaccountname>.blob.core.windows.net/<mystorageaccountcontainername>/st_primary.mdf')
GO
ALTER DATABASE [stretch_test]
	MODIFY FILE (NAME = N'st_user_data', FILENAME = N'https://<mystorageaccountname>.blob.core.windows.net/<mystorageaccountcontainername>/st_user_data.ndf')
GO
ALTER DATABASE [stretch_test]
	MODIFY FILE (NAME = N'st_Log', FILENAME = N'https://<mystorageaccountname>.blob.core.windows.net/<mystorageaccountcontainername>/st_log.ldf')
GO

Once we have modified our database, we can put it OFFLINE.
USE master

ALTER DATABASE stretch_test SET OFFLINE WITH ROLLBACK IMMEDIATE
And then move the files to Azure blob storage. This can be done either using the Upload functionality integrated in Azure blob storage or using powershell.
Uploading the files using the Azure Portal
This is very intuitive, but just in case.
You’ll need to go to ‘All resources → Your Storage Account → Blobs → Your container → Upload’
Then you’ll find something like this, where you can navigate your files to locate them and upload.
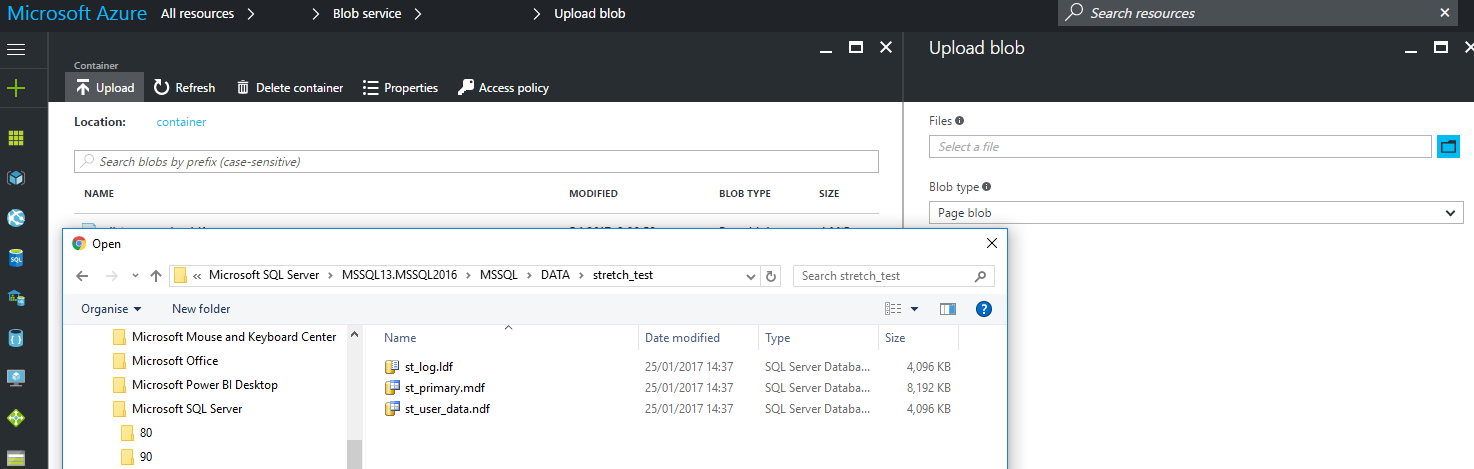
**Important to select ‘Page Blob’ if you don’t want to suffer this**
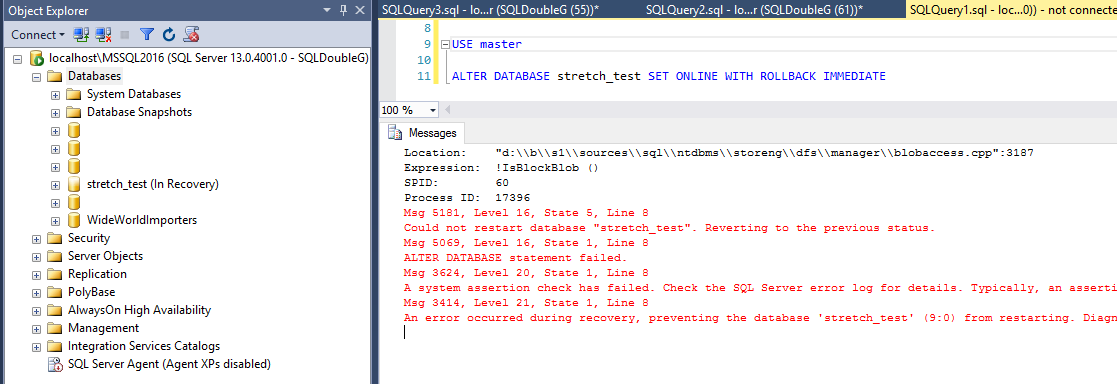
If you have missed this, selected ‘Block blob’ and then tried to set the database ONLINE, you will receive this error.
The only workaround I found is to stop the server (since the database doesn’t want to go OFFLINE either) to release the files in Azure and then delete and upload them again, this time with the correct Blob Type.
Uploading the files using Powershell
We can use Powershell to copy the files into the cloud using this example.
# begin
# Update with the name of your subscription.
$SubscriptionName = "YourSubscription"

# Update with the name of your storage account.
$StorageAccountName = "yourstorageaccount"

# Choose your location, see Get-AzureRmLocation for choices
$Location = "YourLocation"

# Update with the name of your container.
$ContainerName = "YourContainer"

# All your database files to be moved to Azure.
$FilesToUpload = @("C:\Program Files\Microsoft SQL Server\MSSQL13.MSSQL2016\MSSQL\DATA\move_to_az\move_to_az.mdf",
                    "C:\Program Files\Microsoft SQL Server\MSSQL13.MSSQL2016\MSSQL\DATA\move_to_az\move_to_az_USER_DATA_1.ndf",
                    "C:\Program Files\Microsoft SQL Server\MSSQL13.MSSQL2016\MSSQL\DATA\move_to_az\move_to_az_log.ldf")

# Update with the name of your resource group
$resourceGroupName= 'YourResourceGroup'

Login-AzureRmAccount

# set the tenant, subscription and environment for use in the rest of
Set-AzureRmContext -SubscriptionName $subscriptionName

# Get the access keys for the ARM storage account
$accountKeys = Get-AzureRmStorageAccountKey -ResourceGroupName $resourceGroupName -Name $storageAccountName

# Get account context using an ARM storage account
$storageContext = New-AzureStorageContext -StorageAccountName $storageAccountName -StorageAccountKey $accountKeys[0].Value

foreach ($FileToUpload in $FilesToUpload){
    # Upload a blob into a container.
    Set-AzureStorageBlobContent -Container $ContainerName -File $FileToUpload -Context $storageContext -BlobType Page # IMPORTANT!!!!
}
That will move the files same as the GUI, again do not forget to specify the correct Blob Type to avoid problems.
Back to life
At this point we are good to bring our database ONLINE again without problems, so let’s just do it
USE master

ALTER DATABASE stretch_test SET ONLINE WITH ROLLBACK IMMEDIATE
Squeezing the cloud
Finally with our database online and all our files in the cloud, we can take advantage of this fancy feature called ‘File-snapshot backups’ which, somehow, for those with experience in enterprise environments with SAN infrastructure might sound familiar.
I see File-snapshot backups like SAN snapshot backups, so they happen immediately and won’t take much space as they are connected to the original files, but let’s compare them with regular backups to see if that is true.
With all this movement from on-prem to the cloud, I almost forgot our database is just empty 🙂 so first let’s get some data there.
SELECT o1.*
INTO dbo.some_data
FROM sys.all_objects AS o1
WHERE 1=0
GO

INSERT INTO dbo.some_data
SELECT o1.*
FROM sys.objects AS o1
CROSS JOIN sys.all_objects AS o2
GO 10
I love this trick to create quick copies of tables and not to worry about scripting them out and so, but remember that might be different than the originals as not all properties are copied.
So we have some data, in my case about 230MB so let’s take a regular SQL Backup
USE master

BACKUP DATABASE stretch_test
TO URL = 'https://storageaccount.blob.core.windows.net/container/stretch_test_SQL_backup.bak'
WITH COMPRESSION
/*
Processed 29800 pages for database 'stretch_test', file 'st_primary' on file 1.
Processed 8 pages for database 'stretch_test', file 'st_user_data' on file 1.
Processed 8 pages for database 'stretch_test', file 'st_stretch_data' on file 1.
Processed 3 pages for database 'stretch_test', file 'st_Log' on file 1.
BACKUP DATABASE successfully processed 29819 pages in 19.627 seconds (11.869 MB/sec).
*/
See that performance isn’t great at all, but remember our files are in the cloud, the SQL engine on-prem and the backup destination back in the cloud, so you totally depend on your internet connection unless you want to pay a ExpressRoute.
Needless to say all this data moving back and forth is not a great idea, consider yourself warned!
Now let’s see with the new feature.
USE master

BACKUP DATABASE stretch_test
TO URL = 'https://storageaccount.blob.core.windows.net/container/stretch_test_FS_backup.bak'
WITH FILE_SNAPSHOT
/*
Processed 0 pages for database 'stretch_test', file 'st_primary' on file 1.
Processed 0 pages for database 'stretch_test', file 'st_user_data' on file 1.
Processed 0 pages for database 'stretch_test', file 'st_stretch_data' on file 1.
Processed 0 pages for database 'stretch_test', file 'st_Log' on file 1.
BACKUP DATABASE successfully processed 0 pages in 0.494 seconds (0.000 MB/sec).
*/
Wow, how is that possible? less than a second, and according to this, SQL Server didn’t actually process anything, so everything must have happened behind the scenes in the cloud.
Now if we go to the Azure Portal to see those files, we can see that they are different.
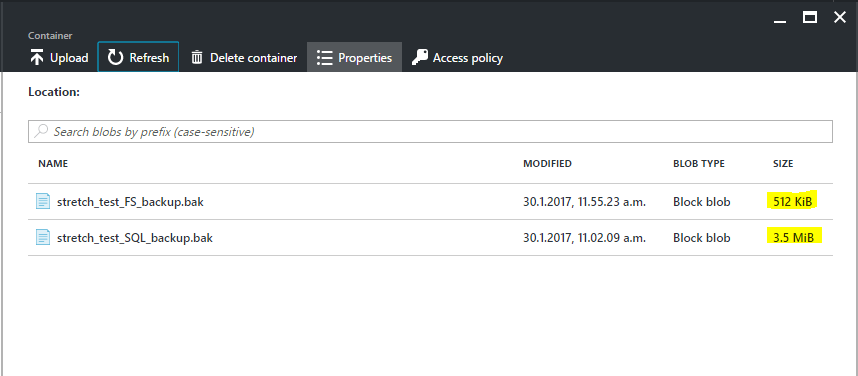
The regular backup took 3.5MB (big hurrah for backup compression) but the snapshot only took 0.5MB and that number is consistent regardless the size of the database, so it will always take half a megabyte, as far as I’ve seen.
How backups files are different
To answer that question, let’s have a closer look to the file snapshot backup to find out the difference.
USE master

RESTORE FILELISTONLY FROM URL = 'https://storageaccount.blob.core.windows.net/container/stretch_test_FS_backup.bak'

Aha! As I suspected, they are just storage snapshots, but since they are fully integrated with SQL Server, the process to do Backup/Restores is the same as we’ve done for years. There is more information and examples of file_snapshot backups in Books Online and Channel9, so I’d recommend you check all that if this is something you’re planning to implement.
Conclusion
There is an amazing range of new features out there, but as always they’re not free and there are numerous gotchas we need to know before we take decisions as important as moving to the cloud.
It’s really fun playing with the cloud, so I recommend it to everybody, even if you don’t have any plans in a near future… you never know.
Thanks for reading and any question just fire them!